Need to prints something on paper?

Printing & Photocopying

Print you paper materials

Printing and Photocopying

In the A3 Library, we offer printing solutions tailored to your individual printing and photocopying requirements. Whether you intend to print out the lecture slides, notes, assignments, posters, or any other materials, the available printing service situated on the 1st floor of the library can accommodate your needs.

To start using the library printing services, it is necessary to top up funds onto your PaperCut account through the Campus ECard Top Up system.

Provided below are the useful guides for the printing services:

PaperCut Login (Photocopying, Print, Scan) User Guide

  1. Click on any document/s which you want to print.

    单击您想打印的文档。

  2. Choose Printer ‘Virtual Printer on 10.68.12.61’ from printer list to print.

    从打印机列表中选择打印机“虚拟打印机系列上 10.68.12.61’来执行打印。

    • *Notes: The documents can reach at any printers available at the library, for example LIB-1 & LIB-2m, if printing using Virtual Printer.
    • *注意:如果使用虚拟打印机打印文件,此文件都可在图书馆内任何一家打印机取得

  3. Click on Printer Properties if you want to choose to print in Black and White (B&W) or Colour.

    点击打印机属性如果你想要打印黑白 (B&W) 或彩色 (无标签)。

  4. Please enter your ID & password in the popup.
    • ID: (Student/Staff ID)

      (学生/员工 ID)

    • Password: (User needs to change the default password after first login)

      (初次登录的用户需更改密码)

    • *Notes: users can select how long they would like to stay connected to Paper Cut server without re-login.
    • *用户可以在登录持续时间选项卡中选择持续在线时间(1,5 或 10 分钟),而无需重新登录。

  5. After log-in, there will be another Green colour popup at the upper right hand side of the screen to show the user’s current balance.

    在 ID 及密码键弹出后,屏幕的右上方将会出现另一个绿颜色弹出显示用户的当前余额。

  6. After the user executes printing, a notification will show that user will have to go to Photocopy Machine ‘Samsung X4300’ to release the printing queue and collect the printing document/s.

    用户执行打印后,通知将显示用户需要到影印机“三星 X4300”释放打印队列,并收集打印文档。

  7. After the printing is executed, user is required to right click on the Green color popup to logout from the Paper Cut Server.

    执行打印后,用户需要右键点击绿色弹出中登出服务器

  8. New user needs to tap the card on the card reader and fill in the required details to link the card to his/her account.

    如果新用户,学生/员工必须先感应您的卡然后填写有关资料以便可以连接您的卡到资料库

  9. User needs to enter the log-in information or just tap his/her student/staff card.

    用户需要输入或感应您的学生/员工卡。

    • ID: (Student/Staff ID)

      (学生/员工 ID)

    • Password: (User needs to change the default password after first login)

      (初次登录的用户需更改密码)

  10. To print the selected document, just click on the document and click ‘Print’.

    从需要打印的文件中选择该文件,并点击“打印”。

  11. To print all the documents on the document list, click on ‘Print All’.

    如果需要打印所有文档列表中的文件,点击“所有打印”。

  12. To cancel any selected document, just click on the document and press ‘X’ to cancel it.

    如果需要取消任何选择的文件,只需点击该文件,然后按’X’取消它。

  13. To use Photocopy or Scan function, click on ‘Use Copier Functions’.

    如果要使用复印或扫描功能,点击“使用复印功能”。

  14. To access the Photocopy & Scan function, Press ‘Use Copier Function’ -> a popup will appear -> press ‘OK’.

    为了使用复印和扫描功能,按“使用复印功能” – >弹出将如下图所示 – >按“OK”。

  15. After photocopying or scanning job is completed, scroll down from the upper edge of right hand side and click on the profile icon to logout.

    复印文件或扫描后,从右侧滑下并点击人的图标。例如点击“管理”登出

  16. Or you can tap your card again to log out.

    或者您可以使用您的卡感应多一次登出。

  17. Finally, press ‘Logout’.

    点击“登出”

Photocopying and Scanning User Guide

Scan To PC or USB

  1. Tap on the Scan & Send  application on the screen.

    点击屏幕上的扫描和发送应用程序。

  2. Click the PC icon to open up the list of computers which are available for receiving the scanned copy.

    单击‘PC’图标,开拓其可用于扫描和发送的电脑列表。

  3. Choose the name of the computer which you would like to send to, for example LIB-15.

    选择您的电脑名字,例如 LIB-15 的名称。

  4. Click on “File Format” to choose the desired format from a list of available formats.

    点击‘文件格式’以便选择所需的格式。

  5. Click on the icons above to choose whether to scan the file in Black and White or Color.

    选择将文件扫描至黑白(Mono) 或彩色 (Color) 。

  6. Furthermore, you can edit the file name if you want to.

    此外,您可以编辑特定的文件名。

  7. You may choose to scan single/double sided.

    您也可以选择扫描单面或双面。

  8. Press the Start button on the touchscreen to start scanning.

    按下触碰屏幕上的开始按钮开始扫描。

  9. Go to computer desktop and open the “SAMSUNG SCAN” folder to check for the scanned file/s.

    扫描完成的文件将传送到电脑桌面的“SAMSUNG SCAN”文件夹中。

  10. Other than scan to PC, you can also scan to USB.

    除此之外,您也可以把文件传送到 USB 中。

  11. Plug the USB pen drive into the USB port located at the right side below the touch screen. Then, a screen will pop up. Select send to proceed.

    首先在触碰屏幕右下方的 USB port 插入 pen drive。触碰屏幕界面就会跳出选择界面(Box/Send)。选择 Send 以进入下一个界面。

  12. Click on the icon pointed by blue arrow and choose USB. Then follow step 4 to 8 and press start to scan.

    点击图中的蓝色箭头指向的地方然后选择 USB。重复步骤 4 至 8 并按下蓝色开始按钮即可将文件从复印机传输到 USB。


Copying

  1. Tap on the Quick Copy icon on the screen.

    点击屏幕上的快速复印图标。

  2. Choose the desired paper source, for example you may choose A3 which is in Tray 2 (If there is).

    选择所需的纸张来源,例如,你可以选择 A3 (如果可以在纸盒2有A3纸张)。
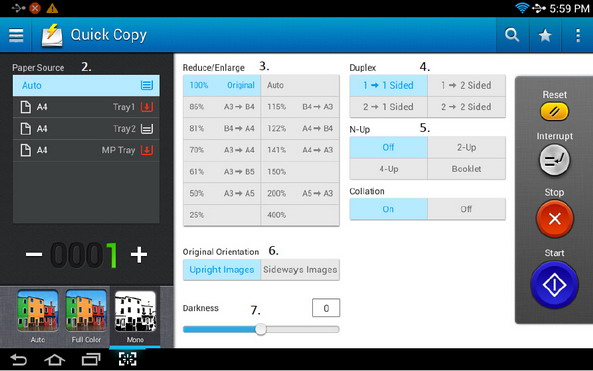
  3. The Reduce / Enlarge function is to allow you print an image larger or smaller than the original. Tap the icons on the screen to reduce a copy by 25 % to 99 %, or enlarge a copy by 101 % to 400 %.

    缩小/放大功能是让你打印图像比原来的更大或更小。点击屏幕上的图标由 25%降低副本到 99%,或 101%,放大复印到 400%。

    • Auto: Reduces or enlarges the copy based on the size of the output paper.

      自动:缩小或放大基于输出纸张尺寸的副本。

    • 100 %( Original): Prints the copy at the same size as the original.

      100%(原始):打印在相同的尺寸与原始的拷贝。

    • Custom: You can choose custom percentage (between 25 to 400%).

      自定义:您可以选择自定义的百分比(介于 25%至 400%)。

  4. The Duplex function is to set the machine to print copies on both sides of paper. You can select the Original and Output binding type, either type is Book or Calendar.

    双面功能是设置机器打印在纸张的两面复印件。您可以选择原始和输出绑定类型,或者类型是书籍或日历

    • 1 to 1 sided: For originals or output binding type that are printed on one side only.

      对于打印只在一侧原件或输出绑定类型

    • 1 to 2 Sided: 2 sheets combined into 1 double sided.

      2 张组合成 1 双面。

  5. The N-up function is to allow user to duplicate the image of the sheet into a paper.

    N 合一功能是允许用户把图像复制到纸上。

    • 2-up : Duplicate 2 images of the copied paper onto 1 paper.

      重复复印 2 图像至 1 张纸。

    • 4-up : Duplicate 4 images of the copied paper onto 1 paper.

      重复复印 4 图像到 1 张纸。

  6. Use this option to set the orientation of the original.

    使用此选项可设置最初的方向。

    • Upright Images: Use this setting for an original document loaded with the top toward the back of the machine.

      直立图片:使用此设置把原始文档的顶部朝向机器背面。

    • Sideways Images: Use this setting for an original document loaded into the Top Feeder with the top of the document toward the left side of the machine, or an original document placed on the scanner glass with the top of the document toward the right side of the machine

      侧身图片:使用此设置把原始文档的顶部朝向复印机的左侧。

  7. Darkness: Control the darkness of the copied image/s.

    亮度调整:控制复印图像的亮度。

ID Card Photocopying User Guide

Our machine can print the two sides of the ID card on the same side of paper.
本机可以在一页纸上打印双面身份证原稿。
 
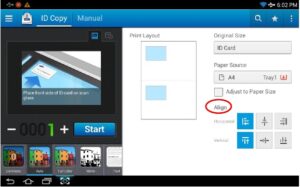
  1. Click ID Copy on the home screen.

    从主屏幕点击 ID 复印应用程序。

  2. Place the front side of the ID Card facing down on the scan glass as indicate by the picture above. Then, close the lid of the scanner.

    将原件的正面朝扫描仪玻璃往下。然后,关闭扫描仪盖板。

  3. Click . The machine would scan the front side.

    点击 开始。(机器开始扫描正面。)

  4. Turn the ID Card over and place it on the scan glass as indicate by the picture above. Then, close the lid of the scanner.

    将原件反面,将其放置在同一个位置,然后,关闭扫描仪盖板。

  5. Click .The machine would scan the back side.

    点击下一步。(机器开始扫描背面。)

    • If you do not press the button, only the front side will be copied.

      如果您不按下按钮,只有正面将被复制

    • If the original is larger than the printable area, some portions may not be printed.

      如果原件大于可打印区域较大,可能无法打印某些部分。

  6. Brightness is to let user adjust the brightness of the copied image.

    亮度‘Darkness’ 是为了让用户控制复印图像的亮度。

  7. User can choose whether to print the ID Copy in Black & White or Colour.

    用户还可以选择是否要打印黑白(Mono) 或彩色 (Color)。

USB Printing User Guide

  1. There are 2 USB ports at the right side below the touch screen. Students or staff are able to print from it and scan to it.

    在 LCD 荧幕的右侧有 2 个 USB 插口,学生或教职人员可以使用 USB 打印或扫描至 USB。
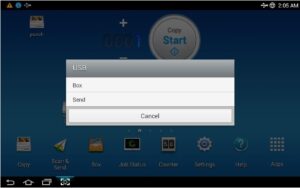
  2. After plug in the USB, a pop-up notification would appear on the touch screen and the user needs to choose “Box” to browse through what’s in the USB.

    插入 USB 后,打印机的 LCD 屏幕上将弹出显示。您需 要选择 Box 以便可以浏览 USB 内的档案。
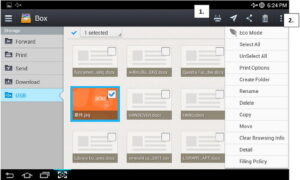
  3. Select the desired file and click on 1. for direct printing (default Black n White).

    选择所需的文件,然后单击 1.直接打印(默认黑白)。

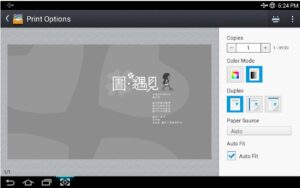
  4. If want to print in Color, press on the desired file for a few seconds then click on 2. to choose Print Options.

    如果想打印彩色,按着所需的文件几秒钟,然后点击 2. 选择打印选项。

    • *Notes: Only selected file types, i.e. PDF, JPG, TIFF, can be printed.

      *注意: 只有指定文件格式能打印: PDF, JPG, TIFF

  5. Click on the desired options and click on print.

    选择您所需的选项然后选择打印。

Self Service Printing Refund Process

Papercut – Self Services Printing Refund Process

This is to cater for the event of no printout from printer even after the payment has been deducted.

Patron to self perform all the below steps for the printing refund request, if requires.

A. Papercut Software

  1. Login to student’s papercut account using Campus ID and password.
  2. Snapshot Summary” page – includes Username for verification purpose.

Snapshot 1


  1. SnapshotTransaction History” page, includes the activity logs and jobs with no printout.

Snapshot 2

  1. SnapshotRecent Print Jobs” page, includes the activity logs and jobs with no printout.

Snapshot 3

B. Go to Photocopy Machine

5. Login using Campus ID and Password at the library’s photocopy machine.
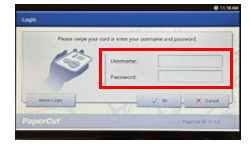
6. SnapshotHeld Print Jobs” page, press on “Use Copier Functions” to confirm your account. Then, press OK to go “Home Screen”.

Snapshot 4

7. Swipe down from upper right corner of the screen to check on the “Errors” alert. Identify the error(s) and take a snapshot of it. Press on the Error and snapshot the error page details.

Snapshot 5 & 6

8. Email refundxmu@thecopier.com.my and attached with all SIX snapshot’s images per your no printout query.

9. The refund request will be investigated, reviewed and You will be updated on the refund status accordingly approximately 14 working days.

Library Contact Information

Xiamen University Malaysia Library

A3 Building
Jalan Sunsuria,Bandar Sunsuria,
43900 Sepang, Selangor

Phone : 03-8800 6801
Email : librarian@xmu.edu.my